One of the main benefits of using KORE’s Insulated Foundation System is how easily it can be installed, reducing the labour and materials required when compared to a strip or raft foundation. Check out the short video below to see how an insulated foundation system made from Expanded Polystyrene installs in only a few days:
How does an insulated foundation system work?
KORE’s Insulated Foundation System wraps the entire foundation of your home in a layer of Expanded Polystyrene. By insulating the foundation, you ensure the continuity of insulation, virtually eliminating one of the most common thermal bridges: the wall-to-floor cold bridge. By eliminating the wall-to-floor cold bridge, an insulated foundation system can provide ground floor U-values as low as 0.10W/m2K. These low U-values far surpass the requirements of Ireland’s Building Regulations, and can easily be used to achieve Passive House Certification.
All projects start by obtaining a quotation from your local KORE Insulation sales representative. You can easily request a quotation through our website by submitting your drawings or plans. We’ll provide you with a customised quotation based on the plans you submit and answer any technical questions you may have. Once you’re happy with the price, we’ll send off your foundation to be fully engineered to meet the needs of your project.
How quickly does an insulated foundation system take to install?
You may have noticed by watching the video above that the insulated foundation system only takes a few days to install. Once you’ve placed an order, the insulation will be cut to your project’s requirements and delivered directly to the job site. The insulation is individually marked before it’s packed for shipping so you’ll know how to lay out the pieces once you start the installation process.
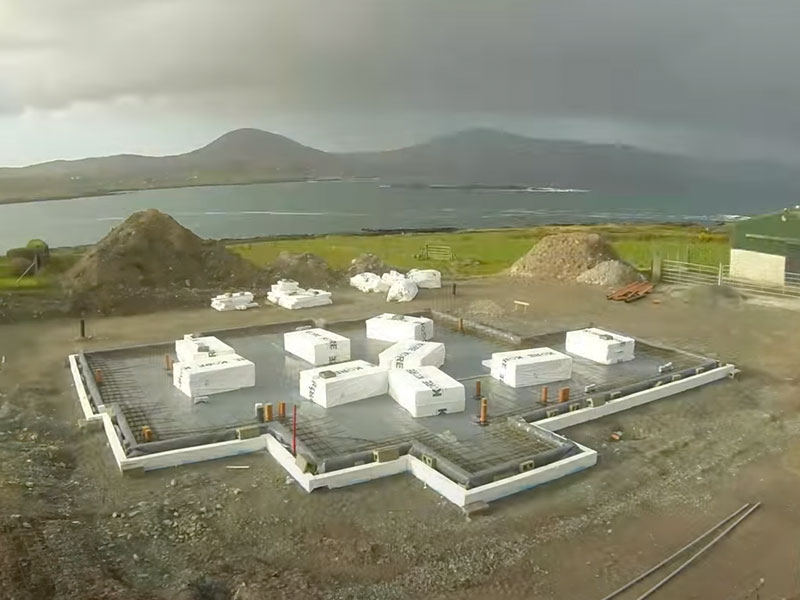
The site should be prepared for the insulated foundation system according to the instructions of a suitably qualified engineer. A typical installation will include clearing the topsoil and digging to a level that is free of vegetation. Once complete, a minimum of 150mm 18-35mm stone is compacted into 50mm layers, depending on the site conditions. The stone can be compacted using a roller or by compacting each layer with a 125kg plate compactor. All services should be taken into consideration at this point and a void formed in the stone to take services at a later stage.
A 10-22mm layer of 804 concrete binding or equivalent is installed over the compacted stone. Starting at the highest point, in the case of a double L arrangement, the outer EPS300 L piece is set in place. The corner pieces are cut on site to ensure a close butting of sheets at each corner. The EPS300 can easily be cut to suit any angle required by the design. The entire outer L is placed in the foundation first, followed by the inner L.
For services that need to penetrate to the outer L, the EPS should be cut before the concrete is poured to accommodate a void for fitting at a later stage.
For internal load bearing walls, a thickening of concrete to 200mm – 300mm must be accommodated. Prior to fitting the floor insulation, the space required for the internal load bearing wall is marked out. EPS in layers of 100mm or 200mm are required under the load bearing wall, as specified by the engineer.
After the placement of the EPS300, the first 100mm layer of KORE Floor EPS100 White and KORE EPS300 Sheets (for load bearing walls) are put in place starting from the perimeter inwards. You’ll do this until the entire foundation is covered in insulation. The floor insulation should be laid with closely butted joints, laid staggered with a break-bonded pattern and fitted tightly at the edges. The DPC or radon barrier is placed over the first layer of EPS insulation and should run over the L detail and out. The second and third layer of KORE Floor EPS100 White floor insulation are then placed over the DPC/radon barrier.
Where appropriate, a second 100mm layer of EPS300 should be placed at the load bearing walls. Steel reinforcement to the specification of the engineer is then put in place and tied in an appropriate manner. Reinforcing bars are used in the outer ring beam and at internal load bearing walls. A steel mesh is used on the concrete slab.
When fitting underfloor heating pipes, the pipes can be clipped to the steel mesh or to the KORE Floor Insulation. The perimeter of the foundation must be braced appropriately for the concrete pour to avoid the EPS from moving under the pressure of the concrete. Typically, this can be achieved by clipping the perimeter strips together using U shaped steel clips, by using timber bracing fixed to the outside of the L, or by back filling the outer L with 18mm – 35mm of stone.
25 to 30 N concrete (depending on the requirements of the engineer) is poured into the ring beam and slab in one pour. The concrete is vibrated to ensure appropriate steel and concrete coverage.
What makes an insulated foundation system so affordable?
The most money is saved during the installation of an insulated foundation system. One key benefit is the reduced amount of concrete required. Most projects typically use 4o to 45 percent less concrete when compared to a raft or strip foundation. Most installations typically require less labour, so you’ll see savings there, as well. The quotations that KORE provide will include the cost of the material and transport to the job site. You’ll need to plan for engineering costs and find a suitable contractor to install the system if you’re not installing it yourself.
You will also realise savings over the lifetime of the building. Low energy homes use much less energy compared to some of the inefficient building stock of the past. A properly insulated home will cost much less in heating and cooling costs per year, allowing you to save beyond the materials and labour required of the system.